Using Cyberduck With Amazon S3

Ameley Kwei-Armah
Read Time: 5 mins
04 Jun 2024
Category: Storage
I was recently introduced to a File Transfer Protocol called Cyberduck.io and how I can use it to read and write files to an S3 bucket. Cyberduck is for when you need to transfer large amounts of files. In my specific use case, I didn’t need to but I wanted to explore how to use it but It was also good practice for writing custom IAM policies. What is Cyberduck? Cyberduck is an open-source client for FTP and SFTP, WebDAV, and cloud storage available for macOS and Windows. Cyberduck is written in Java and C# using the Cocoa user interface framework on macOS and Windows Forms on Windows. (Wikipedia) Using Cyberduck to read/write to an S3 bucket was done in 5 simple steps: 1. Create an S3 Bucket.
2. Create an IAM User for the S3 Bucket.
3. Create an Access Key for the new user.
4. Create a Custom IAM User Policy and Bucket Policy.
5. Connect to Cyberduck to the S3 Bucket with the Access Key. Step 1: Create an S3 Bucket Creating an S3 bucket is extremely straightforward and simple. I created mine in the CLI instead of the AWS Management Console, but you can find my guide on how to create an S3 bucket in the console HERE. To create a S3 bucket in the CLI you can use the following commands. Note, you will need to have the AWS CLI install on your local computer and have the necessary access set up to access your account. If you haven’t got it installed you can find the instructions HERE. If you are creating a bucket outside of us-east-1 region you will need to add a location constraint (like you see in my command below), otherwise your bucket will automatically be created in that region. For more bucket CLI commands take a look at the AWS official docs HERE.
aws s3api create-bucket \
--bucket my-bucket \
--region eu-west-1 \
--create-bucket-configuration LocationConstraint=eu-west-1Step 2: Create an IAM User for the S3 Bucket I created a user in the CLI instead of the AWS Management Console, but you can find my guide on how to create an IAM User in the console HERE. Be sure to replace ‘Bob’ with the actual username you want for the user.
aws iam create-user \
--user-name Bob
If you want to add more commands when creating your IAM user take a look at the official AWS documentation HERE. The terminal should output details about the created user. You can always go into the management console to double-check the user is there. Step 3: Create Access Key for the New User. The access key was also created using the CLI using the following command but can also be created in the AWS Management Console. Be sure to replace ‘Bob’ with the actual username of the user you just created.
aws iam create-access-key \
--user-name Bob
Make sure that you take note of the access key and the secret access key that is outputted into the terminal as you will need this for Cyberduck! For more information on creating access keys in the CLI take a look at the AWS official documentation HERE. Step 4: Create Custom IAM User Policy and Bucket Policy. I created my policies in the AWS Management Console as it was visually easier to spot mistakes and minimize how many times I had to edit it. I located my newly created user and created an inline policy with the following. Be sure to replace “YOUR-BUCKET-NAME” with the actual name of your bucket. IAM Policy
{
"Version": "2012-10-17",
"Statement": [
{
"Effect": "Allow",
"Action": [
"s3:ListBucket",
"s3:GetBucketLocation"
],
"Resource": "arn:aws:s3:::YOUR-BUCKET-NAME"
},
{
"Effect": "Allow",
"Action": [
"s3:GetObject",
"s3:PutObject",
"s3:DeleteObject"
],
"Resource": "arn:aws:s3:::YOUR-BUCKET-NAME/*"
}
]
}
Next, I navigated to my S3 bucket and added the following bucket policy. Be sure to replace the dummy text with your actual information. S3 Bucket Policy
{
"Version": "2012-10-17",
"Statement": [
{
"Effect": "Allow",
"Principal": {
"AWS": "arn:aws:iam::YOUR-ACCOUNT-ID:user/USERNAME"
},
"Action": "s3:*",
"Resource": [
"arn:aws:s3:::YOUR-BUCKET-NAME",
"arn:aws:s3:::YOUR-BUCKET-NAME/*"
]
}
]
}
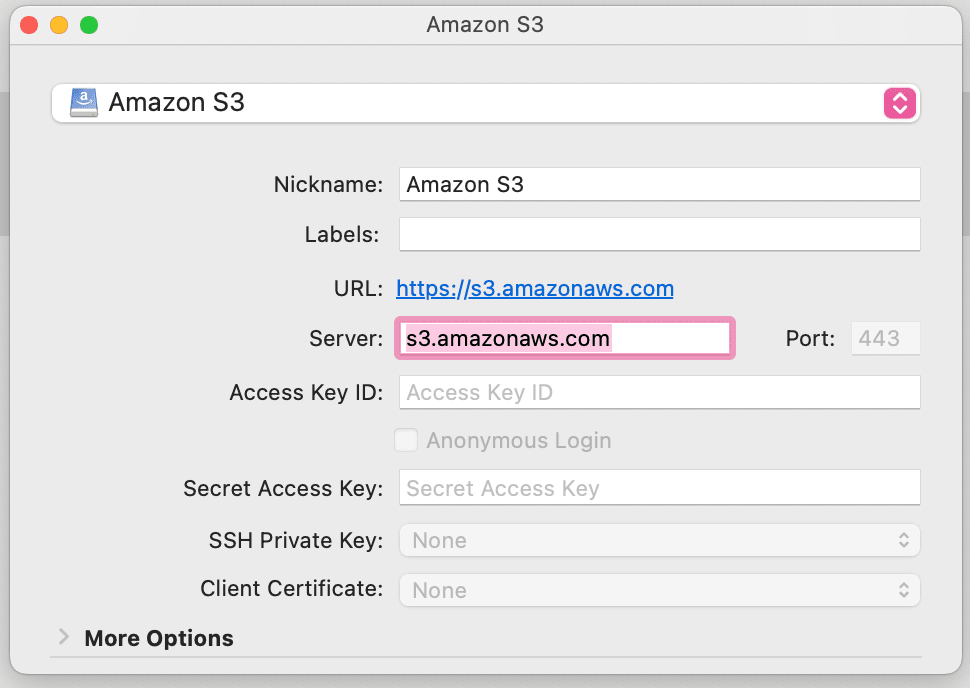
Step 5: Connect to Cyberduck to the S3 Bucket with the Access Key. Assuming you have successfully downloaded and installed Cyberduck on your system, the next steps are very straightforward. If you haven’t, you can download it HERE. The following steps are what I did to connect to my S3 Bucket with Cyberduck. I watched a helpful tutorial HERE if you prefer video format. 1. Open up Cyberduck and click the + button at the bottom of the window on your left to create a new bookmark. 2. Make sure the drop-down that is selected in Amazon S3 3. Add in your Access Key and your Secret Access Key for the IAM user you created 4. Unlike the video (if you opted to watch it) I appended the name of my bucket at the beginning of the server address as I had problems connecting to my bucket otherwise. Your window should look like this (with your access and secret keys added).

5. Exit out of the modal and then double click on the bucket. If you cannot connect to the S3 bucket take a look at the Cyberduck documentation HERE. 6. Once you’ve successfully connected to the bucket you can drag and drop your files into Cyberduck 7. Go into the Management Console and check that your files are in your S3 bucket And that’s it! You’ve connected Cyberduck to your S3 bucket and transferred files into it!
Photo made on Canva.


